# Software description of the Hand
## Robot Operating System (ROS)
Our hand works within the ROS framework.
_”ROS is an open-source, meta-operating system for your robot. It provides the services you would expect from an operating system, including hardware abstraction, low-level device control, implementation of commonly-used functionality, message-passing between processes, and package management. It also provides tools and libraries for obtaining, building, writing, and running code across multiple computers.”_ - ROS.org
You can find the fundamental ROS concepts explained [here](http://wiki.ros.org/ROS/Concepts) and a technical overview of the implementation of ROS [here](http://wiki.ros.org/ROS/Technical%20Overview).
## Accessing Data from the Hand
There are four main ways to access data from the hand: * Graphical User Interface (defined in the setion below) * Command line interface (defined in the sections below) * SrHandCommander (defined in the sections below) * Using [rospy](http://wiki.ros.org/rospy) or [roscpp](http://wiki.ros.org/roscpp)
### Example: accessing joint state data
Using the graphical user interface to view the joint state data in the Data Visualizer.
Using the Command line interface to view the joint state data in the topic /joint_state
Using SrHandCommander methods of: * current_state = hand_commander.get_current_state() * joints_position = hand_commander.get_joints_position() * joints_velocity = hand_commander.get_joints_velocity()
Using [ROS Python subscriber](https://github.com/shadow-robot/sr_interface/blob/noetic-devel/sr_example/scripts/sr_example/advanced/sr_subscriber_example.py) or [ROS CPP subscriber](http://wiki.ros.org/ROS/Tutorials/WritingPublisherSubscriber%28c%2B%2B%29)
## Graphical User Interface
The majority of functionality is provided by the software Application Programmer Interface (API). However, a few simple functions are provided in the Graphical User Interface (GUI) to test the hand, validate that it is working correctly, and adjust some of its settings.
### Starting the interface
You may open the Graphical User Interface to try out some functions of the hand. From the Docker terminal, type:
`bash
$ rqt
`
This interface contains a number of plugins for interacting with the EtherCAT hand. Most of them are available from the Plugins → Shadow Robot menu.
#### Starting the interface with namespaces
Namespaces are very useful in ROS because they allow users to isolate elements of the network to prevent accidental errors as explained [here](http://wiki.ros.org/Names). In order to open the Graphical User Interface within a certain namespace, type:
`bash
$ rosrun rqt_gui rqt_gui __ns:=<namespace>
`
### Robot Monitor We can check that everything on the robot is working correctly using the Diagnostic Viewer.
Plugins → Robot Tools → Diagnostic Viewer
`eval_rst
.. image:: ../img/robot_monitor.png
`
This brings up a dialog box containing a tree of all parts of the robot. All parts should be marked with a green tick.
You can examine one motor in detail by double-clicking on it. This brings up the Motor Monitor dialog. This window can be used to check the status of a motor, or debug any problems.
`eval_rst
.. image:: ../img/monitor_single_motor.png
`
The following table has some more information on what each of these fields means.
`eval_rst
+------------------------------------------------+-------------------------------------------------------------------------------------------------------------------------+
|                   Item                         |                                                       Description                                                       |
+================================================+=========================================================================================================================+
| Full Name                                      |                                                                                                                         |
+------------------------------------------------+-------------------------------------------------------------------------------------------------------------------------+
| Component                                      |                                                                                                                         |
+------------------------------------------------+-------------------------------------------------------------------------------------------------------------------------+
| Hardware ID                                    |                                                                                                                         |
+------------------------------------------------+-------------------------------------------------------------------------------------------------------------------------+
| Level                                          |                                                                                                                         |
+------------------------------------------------+-------------------------------------------------------------------------------------------------------------------------+
| Message                                        | Any error or status messages                                                                                            |
+------------------------------------------------+-------------------------------------------------------------------------------------------------------------------------+
| Motor ID                                       | This is the motor number. Range [0..19]                                                                                 |
+------------------------------------------------+-------------------------------------------------------------------------------------------------------------------------+
| Motor ID in message                            | For debugging only                                                                                                      |
+------------------------------------------------+-------------------------------------------------------------------------------------------------------------------------+
| Strain Gauge Left / Right                      | These are the ADC readings from the two gauges                                                                          |
+------------------------------------------------+-------------------------------------------------------------------------------------------------------------------------+
| Executed Effort                                |                                                                                                                         |
+------------------------------------------------+-------------------------------------------------------------------------------------------------------------------------+
| Motor Flags                                    | See motor flags table below                                                                                             |
+------------------------------------------------+-------------------------------------------------------------------------------------------------------------------------+
| Measured current                               | Current flowing through the motor (Amps)                                                                                |
+------------------------------------------------+-------------------------------------------------------------------------------------------------------------------------+
| Measured Voltage                               | The motor power supply voltage. Not the voltage at the motor                                                            |
+------------------------------------------------+-------------------------------------------------------------------------------------------------------------------------+
| Temperature                                    | The temperature measured near the motor. The actual motor winding temperature will be higher than this. (ºC)            |
+------------------------------------------------+-------------------------------------------------------------------------------------------------------------------------+
| Number of CAN messages                         | Received messages should be twice the transmitted messages                                                              |
+------------------------------------------------+-------------------------------------------------------------------------------------------------------------------------+
| Force control P, I, D terms                    | These are the PID terms from inside the motor's torque controller. They may be useful for debugging if plotted.         |
+------------------------------------------------+-------------------------------------------------------------------------------------------------------------------------+
| Force control F, P, I, D, Imax, Deadband, Sign | These are the FPID gain settings used by the motor's torque controller. They can be changed using the Hand Tuning.      |
+------------------------------------------------+-------------------------------------------------------------------------------------------------------------------------+
| Last Measured Effort                           | Difference between the two gauge readings (Torque)                                                                      |
+------------------------------------------------+-------------------------------------------------------------------------------------------------------------------------+
| Last Commanded Effort                          | Torque requested by the host-side control algorithms                                                                    |
+------------------------------------------------+-------------------------------------------------------------------------------------------------------------------------+
| Encoder Position                               | The angle of the joint in radians (ROS always calls this Encoder position, even if the robot uses Hall effect sensors)  |
+------------------------------------------------+-------------------------------------------------------------------------------------------------------------------------+
| Firmware svn revision                          | xxxx: The latest version of the firmware available at build time                                                        |
+------------------------------------------------+-------------------------------------------------------------------------------------------------------------------------+
|                                                | xxxx: The version of the firmware in the motor MCU                                                                      |
+------------------------------------------------+-------------------------------------------------------------------------------------------------------------------------+
|                                                | False: There are no un-checked-in modifications to this firmware. This should never be true.                            |
+------------------------------------------------+-------------------------------------------------------------------------------------------------------------------------+
`
### Hand Tuning It is possible to adjust the settings for any of the Position or Force (Motor) controllers.
Plugins → Shadow Robot → Advanced → Hand Tuning
#### Position controller
`eval_rst
.. image:: ../img/adjust_position_controllers.png
`
Here you can select a finger, thumb or wrist joints, and adjust the different position control parameters. Click
`Set Selected`to send the new values to the motors and make them take effect.
“P”, “I” & “D” terms: Gain parameters of the position PID controller. By default, Shadow tunes the parameters using P or PD combinations. The user can add “I” gains in the control if they consider it necessary.
Max_force: This puts a limit on the output (PWM) value that will be sent from the host to the motor by the position controller. It can be useful when setting up a controller for the first time to limit the motor power to a safe level.
Position_Deadband: The error is considered to be zero if it is within ±deadband. This value should be set as a little more than the noise on the sensor. The units of deadband are the same as the value being controlled. So, the deadband for a position controller is in radians.
#### Force controller
`eval_rst
.. image:: ../img/adjust_torque_controllers.png
`
“P”, “I” & “D” terms: Gain parameters of the torque PID controller. By default, Shadow tunes the paramenters using just P gain for the torque control.
Max_PWM: This puts a limit on the final PWM value that will be sent to the motor by the torque controller. It can be useful when setting up a controller for the first time to limit the motor power to a safe level.
Deadband: The error is considered to be zero if it is within ±deadband. This value should be set as a little more than the noise on the sensor. The units of deadband are the same as the value being controlled. The deadband for a torque controller is in the units of the strain gauges.
Torque_Limit: This value is used to limit the PWM at the end of the control loop. The control algorithm reduces the final PWM that goes to the motor making sure that the force in the strain gauge doesn’t overcome this limit value.
Click `Save` to save your settings.
### Bootloader The firmware in the motors MCUs can be updated from the PC, without opening up the motor base. This can be done from the GUI. Shadow will send you a new HEX if there is an update.
Plugins → Shadow Robot → Advanced → Motor Bootloader
You will see a window listing each motor board, along with its current firmware SVN revision number.
`eval_rst
.. image:: ../img/bootloading_new_firmware.png
`
Select Bootloader Hex File: Next, tell the plugin which firmware to use. The file you should choose here is the one sent by Shadow.
Select your motors: Now you may choose which motors to program. Either select one or more motors using the tick boxes, or click the
`Select All`or`Deselect All`button.Program Motors: Now you can click the
`Bootload Motors`button. The process is fairly slow, and takes about a 30 second per motor.
`eval_rst
.. DANGER:: The change of file should be previously confirmed with us to ensure that is compatible with your hardware. **A wrong motor firmware update can crash the system of the robot**.
`
### Change Robot Control Mode Use the Change Robot Control Mode plugin to load one of the 4 different types of controllers set by default. Simply click on a controller type, and it will call a service from the controller_manager to unload the currently running controller if necessary, and load the one you’ve selected.
- If for some reason you need to reset the firmware on a motor, you can either press the reset button on the PCB itself (which requires removal of the base covers), or use this plugin.
Plugins → Shadow Robot → Advanced → Motor Resetter
`eval_rst
.. image:: ../img/resetting_motor_microcontrollers.png
`
Tick the motors you wish to reset, and click
`Reset Motors`. You should see the corresponding joints jiggle as the motors auto-zero the strain gauges.
### Joint Sliders A simple interface has been provided to control the position of each joint using a slider.
Plugins → Shadow Robot → Joint Sliders
`eval_rst
.. image:: ../img/joint_sliders.png
`
A window with twenty sliders will appear. Moving any slider will cause the corresponding joint on the hand to move. You have to start the hand in either position control or teach mode. If the control is changed, reload the plugin to make sure that the sliders correspond to the control that is running at this moment.
### Hand Calibration
This plugin is used internally by Shadow to calibrate the raw data from the position sensors. The calibration has to be run on the NUC machine, therefore rqt has to be started from it. To do that, you can use a desktop icon prepared for this purpose (see the `Shadow NUC RQT` icon and explanation [here](https://dexterous-hand.readthedocs.io/en/master/user_guide/1_2_10_icons_for_hand.html#main-desktop-icons))
- Within rqt, go to:
Plugins → Shadow Robot → Advanced → Hand Calibration
`eval_rst
.. image:: ../img/calibrating_joint_sensors.png
`
It’s very unlikely that the sensors moved inside of the hand, BUT, if you find misalignments with the model and you require a re-calibration, contact Shadow Robot Company here: <support@shadowrobot.com>.
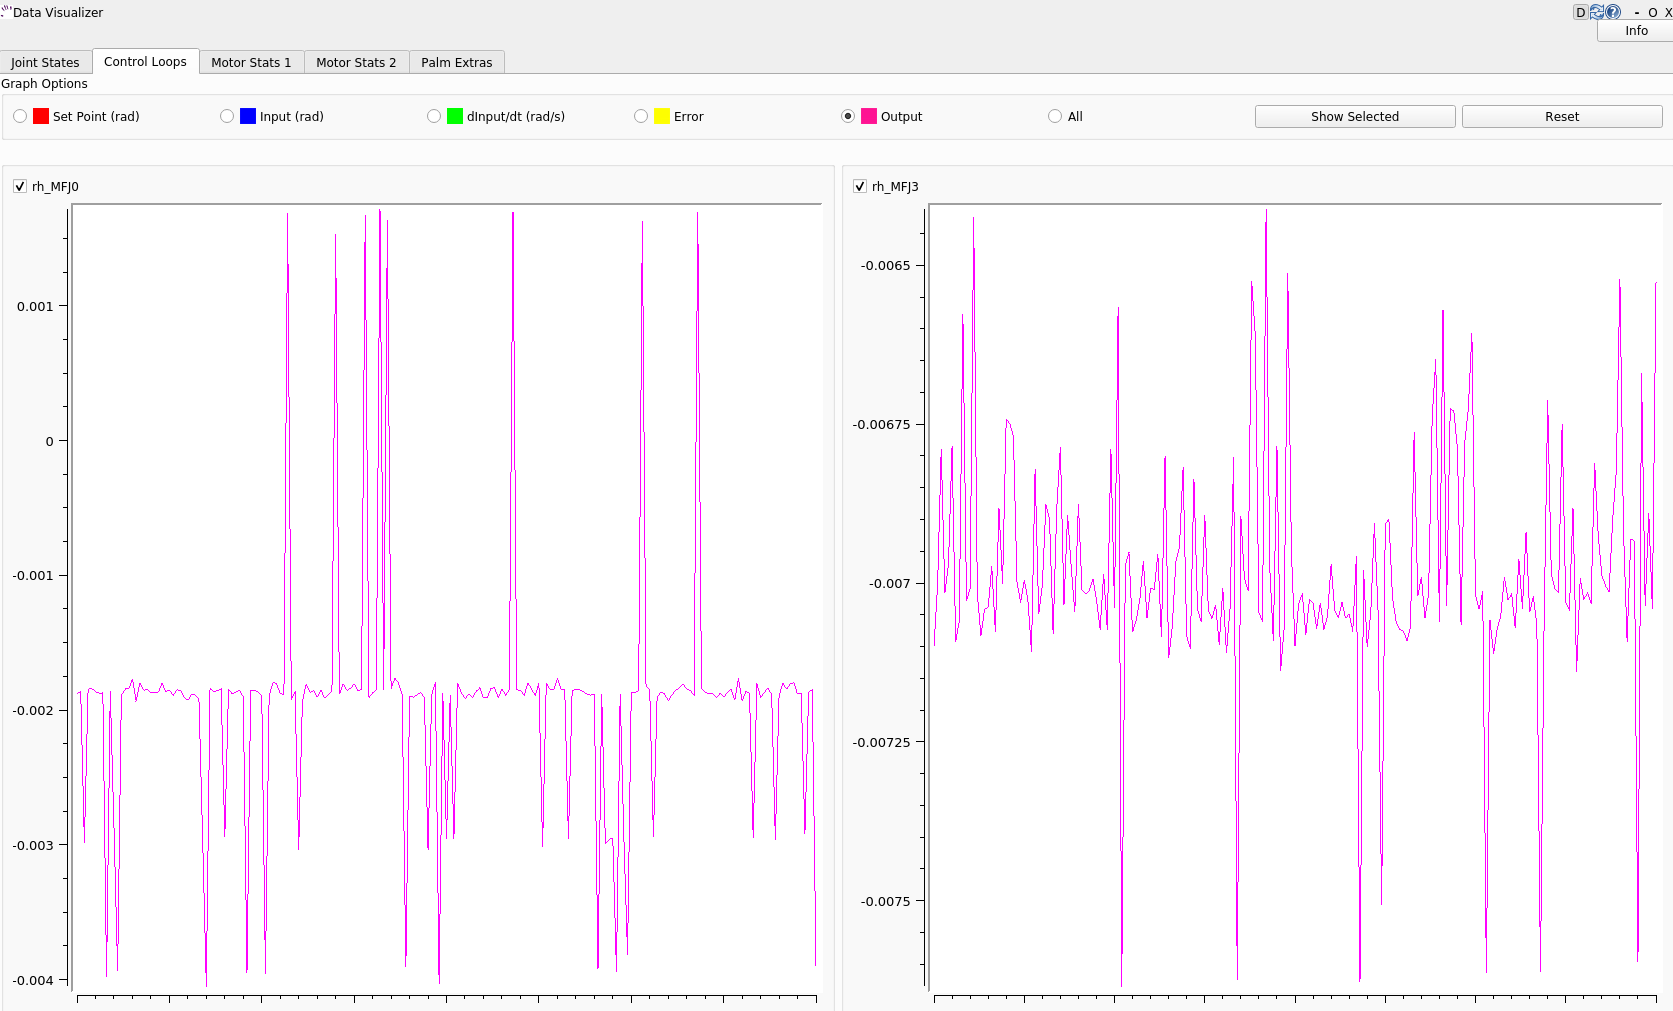
### Data Visualizer A GUI is provided to show all the data available for the Dexterous Hand.
Plugins → Shadow Robot → Dexterous Hand Data Visualizer
`eval_rst
.. image:: ../img/data_visualization_gui_1.png
`
You also can launch it separately from rqt with an optional rosbag by running the following command:
`sh
roslaunch sr_data_visualization data_visualizer.launch rosbag_path:=<absolute_path>
`
In each tab, you can find information about: * Joint states (position, effort, velocity) * Control loops (setpoint, input, dinput/dt, output, error) * Motor stats (Strain Gauge Left, Strain Gauge Right, Measured PWM, Measured Current, Measured Voltage, Measured Effort, Temperature, Unfiltered position, Unfiltered force, Last Commanded Effort, Encoder Position) * Palm extras (Accelerometer, Gyro-meter, Analog inputs) * Tactile sensor data (Pressure AC 0, Pressure AC 1, Pressure DC, Temperature AC, Temperature DC) * Tactile sensor visualizer
The radio buttons let you choose specific data to show (scaled) or you can choose “All” to see several graphs being displayed at the same time (unscaled).
The check buttons next to each graph name allow you to show the graphs you select in larger detail by checking the boxes of the graphs you want to see and clicking “Show Selected”. To return to the full graph view click “Reset”.
This plugin supports a connected hand or a recorded ROS bag. Currently only 1 hand at a time is supported - in case of two hands connected, the plugin will populate its plots for the first detected hand.
This plugin supports a connected hand or a recorded ROS bag. Currently only 1 hand at a time is supported - in case of two hands connected, the plugin will populate its plots for the first detected hand.
- ```eval_rst
Note
The more graphs that are on show on the data visualizer will be slower and can be unreadable. To be able to see a full scaled view of a specific data type, toggle the correct radio button and check the graphs you want to see clearer.
### Fingertip visualization This is a package to graphically display data coming from the tactile sensors of the Dexterous Hand.
Plugins → Shadow Robot → Fingertip Visualization
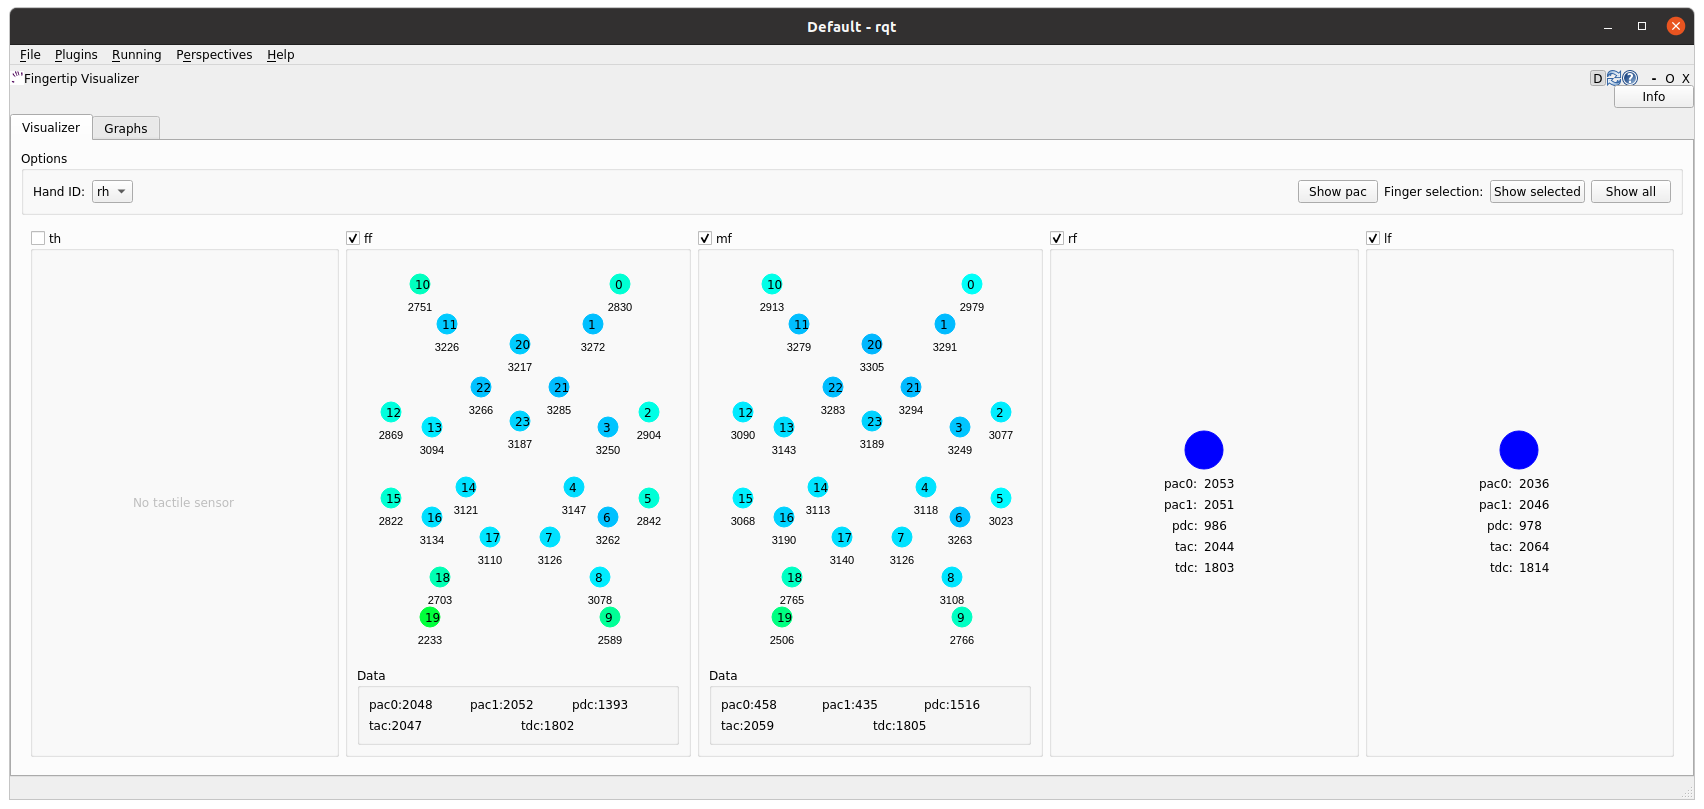
There are 2 available tabs: - Visualizer - Graphs
As a user you can select which hands and corresponding sensors you would like to inspect by selecting the HandID. Selecting a specific finger will enable or disable the refreshing. You have also the possibility to present only selected fingers by pressing Show selected or bring back all of the fingers to the tab by pressing Show all.
The Visualizer tab represents the data in the form of tactile points changing their colours based on the value coming from the sensors. In the case of a Dexterous Hand equipped with Biotacs as tactile sensors, there is also a button which will allow you to switch the visual representation mode of the tactile points between electrodes or pac values coming from the sensor.
The Graphs tab represents the data in the form of plots for all of the data coming from the sensors. Ticking the corresponding checkbox for the datatype will either add or remove the plot from the graph of the finger.
## How to use it
The gui can be started via roslaunch with an optional robag. The rosbag will be played with the -l option (infinite loop):
`
roslaunch sr_fingertip_visualization tactile_visualizer.launch rosbag_path:=<absolute_path>
`
or as an rqt plugin:
rqt
and go to Plugins -> Shadow Robot -> Fingertip Visualizer
This plugin supports presenting the data coming in real time from the Dexterous Hand or from a ROSbag.
## Command line interface All functions of the hand are available from the command line.
In the following sections, Hand refers to the shadow dexterous hand and Host refers to the host computer which is controlling the hand. Assume that all the topics are read-only unless specified otherwise.
### Using rostopic To check how to interact with ROS topics, see: <http://wiki.ros.org/rostopic>.
The following rqt_graph shows the flow of topics between nodes whilst the hand is running.
```eval_rst .. image:: ../img/ethercat_sr_rhand.png
- target
../_images/ethercat_sr_rhand.png
Here is a list of the available topics: - Calibration (Real hand only)
These topics are used during the Hand startup routine to make sure that the Hand is calibrated:
/cal_sh_rh_*/calibrated
/calibrated
An empty message is published to the /cal_sh_rh_**/calibrated* topics for each joint when they are calibrated. The /calibrate_sr_edc node subscribes to these topics and when all of them have had an empty message published to them, it publishes True to the /calibrated topic. Before empty messages have been received by all the joints it publishes False to the /calibrated topic.
Diagnostics (Real hand only)
/diagnostics
/diagnostics_agg
/diagnostics_toplevel_state
These topics update at 2 Hz with information on each joint’s Temperature, Current, Measured effort and Command effort, as well as information about the EtherCat devices and firmware version.
Joint states
/joint_states
This topic is read-only and updates at 100 Hz with the name, position, velocity and effort values of all joints in a Hand.
Example topic message:
name: [rh_FFJ1, rh_FFJ2, rh_FFJ3, rh_FFJ4, rh_LFJ1, rh_LFJ2, rh_LFJ3, rh_LFJ4, rh_LFJ5, rh_MFJ1, rh_MFJ2, rh_MFJ3, rh_MFJ4, rh_RFJ1, rh_RFJ2, rh_RFJ3, rh_RFJ4, rh_THJ1, rh_THJ2, rh_THJ3, rh_THJ4, rh_THJ5, rh_WRJ1, rh_WRJ2] position: [1.279751244673038, 1.7231505348398373, 1.2957917583498741, -0.00406710173435502, 0.054689233814909366, 1.253488840949725, 1.5395435039130654, 0.02170017906073821, 0.1489674305718295, 1.08814400717011, 1.638917596069165, 1.4315445985097324, 0.00989364236002074, 1.2257618075487349, 1.8331224739256338, 1.2888368284819698, -0.13269012433948385, 0.14435534682895756, 0.6980816915624072, 0.18782898954368935, 1.124295322901818, 0.21905854304869088, -0.048455186771971595, -0.0032803323337213066] velocity: [-7.484333985952662e-06, -7.484333985952662e-06, 0.0023735860019749185, 0.00062181267775619, -0.0005871136552505063, -0.0005871136552505063, 0.0020967687295392933, 0.0001739028157522596, 0.0004985252400775274, -9.485516545601461e-06, -9.485516545601461e-06, -0.0007068752456452666, -0.0012475428276090576, 0.0008426052935621657, 0.0008426052935621657, 0.001237001167977189, -0.0026444893567459573, 0.0025260047430310925, -0.0003217106977882921, 6.159570145597239e-05, -0.0023454723015513593, 0.0009436399232442155, 0.00017469681801687975, -4.900148416020751e-05] effort: [-1.3660655058510802, -1.3660655058510802, -2.030169817308198, -1.9577332816789155, 0.0, 0.0, -17.29928766980003, -1.5006516553524243, -1.8579749510438912, -1.504877130092884, -1.504877130092884, -0.3374653182042338, -1.6492254479379729, -8.476660697182016, -8.476660697182016, -3.3867013328219056, -2.3404145772688683, -0.7688013735971971, 11.02319645071454, 0.8482082620071664, 0.08818910881575533, 1.127772119947565, -2.2344970991165316, -3.5544023107705667]
etherCAT (Real hand only)
/rh/debug_etherCAT_data
This topic is published by the driver and updates at 800 Hz with data from the Hand as it is received over EtherCAT, which is useful for debugging.
sensors are the position sensors in the joints, which are included in every packet.
tactile is the data from the tactile sensors, which are included in every packet.
Data is received in two alternative packets for the motor torques, each holds data for half of the 20 motors. If which_motors is 0 then the data is for the first 10 motors. If 1, the data is for the second 10 motors.
motor_data_packet_torque is the raw difference between the strain gauge in tension and the strain gauge in compression for each motor.
motor_data_type is used to specify the data in motor_data_packet_misc. This data has been requested from the host. Which value corresponds to which data is defined [here.](https://github.com/shadow-robot/hand-firmware/blob/ff95fa8fc50a372c37f5fedcc5b916f4d5c4afe2/PIC32/nodes/0220_palm_edc/0220_palm_edc_ethercat_protocol.h#L88)
which_motor_data_arrived is a bitmap, 20x1 demensional array for the 20 motors, which shows which motors data has been received from. For example 349525 = 01010101010101010101.
which_motor_data_had_errors is a bitmap for the motors which have errors.
The tactile sensors attached to the Hand are selected during startup, [their corresponding values are here.](https://github.com/shadow-robot/hand-firmware/blob/ff95fa8fc50a372c37f5fedcc5b916f4d5c4afe2/PIC32/nodes/common/tactile_edc_ethercat_protocol.h#L74)
tactile_data_type is used to specify the data in tactile, similar to motor_data_type and motor_data_packet_misc. In the Example topic message below the PST fingertip sensors are used, its value is refered [here.](https://github.com/shadow-robot/hand-firmware/blob/ff95fa8fc50a372c37f5fedcc5b916f4d5c4afe2/PIC32/nodes/common/tactile_edc_ethercat_protocol.h#L93)
tactile_data_valid is a bitmap for the 5 sensors that is 1 when there are no errors.
idle_time_us is the time margin once the Hand has completed its processing and is ready to communicate on the EtherCAT bus.
`eval_rst
.. Note:: More data is transmitted from the tactile sensors than is published to the etherCAT topic by default.
`
Example /rh/debug_etherCAT_data topic message:- header:
seq: 176798 stamp:
secs: 1528812878 nsecs: 323410491
frame_id: ‘’
sensors: [1303, 1574, 3205, 1780, 1382, 1523, 3164, 1938, 904, 1332, 2977, 1706, 1730, 1434, 3060, 1853, 1955, 1814, 2132, 2294, 2496, 4029, 1668, 2931, 1768, 1377, 26, 27, 28, 29, 30, 31, 0, 19, 8, 9, 0] motor_data_type:
data: 3
which_motors: 0 which_motor_data_arrived: 349525 which_motor_data_had_errors: 0 motor_data_packet_torque: [15, -31, -4, 3, 0, 0, -207, -3, -55, -3] motor_data_packet_misc: [-105, -47, 0, -39, 0, 0, 120, 0, 79, 0] tactile_data_type: 0 tactile_data_valid: 31 tactile: [407, 429, 416, 398, 389] idle_time_us: 430 — header:
seq: 176799 stamp:
secs: 1528812878 nsecs: 324399217
frame_id: ‘’
sensors: [1303, 1574, 3205, 1780, 1382, 1523, 3164, 1938, 904, 1332, 2977, 1706, 1731, 1434, 3060, 1853, 1955, 1814, 2131, 2294, 2496, 4030, 1669, 2931, 1768, 1376, 26, 27, 28, 29, 30, 31, 19, 10, 0, 0, 0] motor_data_type:
data: 4
which_motors: 1 which_motor_data_arrived: 699050 which_motor_data_had_errors: 0 motor_data_packet_torque: [-29, -3, 1, -35, -1, -22, -18, 35, 4, 5] motor_data_packet_misc: [0, 0, 0, 0, 0, 0, 0, 0, 0, 0] tactile_data_type: 0 tactile_data_valid: 0 tactile: [407, 429, 416, 398, 389] idle_time_us: 394
Palm Extras
/rh/palm_extras
This topic updates at 84 Hz with data from additional devices plugged into the palm.
Example topic message:
- layout:
- dim:
label: “accelerometer” size: 3 stride: 0
label: “gyrometer” size: 3 stride: 0
label: “analog_inputs” size: 4 stride: 0
data_offset: 0
data: [26.0, 27.0, 28.0, 29.0, 30.0, 31.0, 4.0, 5.0, 0.0, 8.0]
The first six values are readings from an IMU set in the hand. The IMU is an add-on feature so some hands might not have this data available.
Tactile (Only for a real hand with tactile sensors)
/rh/tactile
This topic is published by the driver at 100 Hz with data from tactile sensors.
Example topic message when using PST fingertip sensors:
- header:
seq: 126618 stamp:
secs: 1528813967 nsecs: 440903704
frame_id: “rh_distal”
pressure: [405, 428, 422, 401, 384] temperature: [1224, 1198, 1225, 1242, 1266]
Example topic message when using BioTac fingertip sensors:
tactiles: - pac0: 2048 pac1: 2054 pdc: 2533 tac: 2029 tdc: 2556 electrodes: [2622, 3155, 2525, 3062, 2992, 2511, 3083, 137, 2623, 2552, 2928, 3249, 2705, 3037, 3020, 2405, 3049, 948, 2458, 2592, 3276, 3237, 3244, 3119] - pac0: 0 pac1: 0 pdc: -9784 tac: 32518 tdc: 0 electrodes: [0, 0, 0, 0, 0, 0, 0, 0, 0, 0, 0, 0, 0, 0, 0, 0, 0, 0, 0, 0, 0, 0, 0, 0] - pac0: 0 pac1: 0 pdc: -9784 tac: 32518 tdc: 0 electrodes: [0, 0, 0, 0, 0, 0, 0, 0, 0, 0, 0, 0, 0, 0, 0, 0, 0, 0, 0, 0, 0, 0, 0, 0] - pac0: 0 pac1: 0 pdc: -9784 tac: 32518 tdc: 0 electrodes: [0, 0, 0, 0, 0, 0, 0, 0, 0, 0, 0, 0, 0, 0, 0, 0, 0, 0, 0, 0, 0, 0, 0, 0] - pac0: 0 pac1: 0 pdc: -9784 tac: 32518 tdc: 0 electrodes: [0, 0, 0, 0, 0, 0, 0, 0, 0, 0, 0, 0, 0, 0, 0, 0, 0, 0, 0, 0, 0, 0, 0, 0]
BioTac (Only for a real hand with Biotac tactile sensors)
These topics are read-only and updated at 100 Hz with data from the biotac sensors, which comprises their pressure, temperature and electrode resistance. This topic is published from the /biotac_republisher node which receives this data from the driver via the /rh/tactile topic. For further information about the biotacs, refer to their documentation: <https://www.syntouchinc.com/wp-content/uploads/2016/12/BioTac_SP_Product_Manual.pdf>
Example /rh/biotac_** topic message:
pac0: 2056 pac1: 2043 pdc: 2543 tac: 2020 tdc: 2454 electrodes: [2512, 3062, 2404, 2960, 2902, 2382, 2984, 138, 2532, 2422, 2809, 3167, 2579, 2950, 2928, 2269, 2966, 981, 2374, 2532, 3199, 3152, 3155, 3033]
Trajectory Controller - Command
/rh_trajectory_controller/command
This topic can be published to and is the set position for the trajectory controller. It comprises an array of all the joints set positions and is used for commanding the robot. For example the rqt joint sliders publish to it.
Example topic message:
joint_names: [rh_FFJ1, rh_FFJ2, rh_FFJ3, rh_FFJ4, rh_MFJ1, rh_MFJ2, rh_MFJ3, rh_MFJ4, rh_RFJ1, rh_RFJ2, rh_RFJ3, rh_RFJ4, rh_LFJ1, rh_LFJ2, rh_LFJ3, rh_LFJ4, rh_LFJ5, rh_THJ1, rh_THJ2, rh_THJ3, rh_THJ4, rh_THJ5, rh_WRJ1, rh_WRJ2] points: - positions: [0.24434609527920614, 0.8203047484373349, 0.8552113334772214, -0.17453292519943295, 1.0297442586766545, 1.4311699866353502, 1.413716694115407, 0.007182575752410699, 0.9773843811168246, 1.5707963267948966, 1.2566370614359172, -0.12217304763960307, 0.4014257279586958, 1.2566370614359172, 1.5184364492350666, 0.017453292519943295, 0.13962634015954636, 0.12217304763960307, 0.6632251157578453, 0.17453292519943295, 1.117010721276371, -0.7504915783575618, -0.03490658503988659, 0.0] velocities: [0.0, 0.0, 0.0, 0.0, 0.0, 0.0, 0.0, 0.0, 0.0, 0.0, 0.0, 0.0, 0.0, 0.0, 0.0, 0.0, 0.0, 0.0, 0.0, 0.0, 0.0, 0.0, 0.0, 0.0] accelerations: [] effort: [] time_from_start: secs: 0 nsecs: 5000000
State
/rh_trajectory_controller/state
This topic is read-only and updates at 50 Hz from the trajectory controller with the positions and velocities of all 24 joints.
Example topic message:
positions: [0.0029928404547430176, 0.0007821521859359137, 0.004102784627362688, -0.001230489872427576, 0.002876479952986344, 0.0006426181816490129, 0.006354919224207833, 0.00213663812281073, 0.003279618063753098, 0.0020929781564538175, 0.0063066586043154516, 0.0038023568140372888, -0.002289758750686488, -1.1040675065743244e-05, 0.008137524637908733, -2.1288137004304986e-05, 0.0009348013388894572, -0.003295237358051928, 0.039981480504079236, -0.0035961821430152696, 0.0032603043080507987, 2.9988784142176428e-05, -0.00029934074598525484, -8.999634459527783e-05] velocities: [-0.0008510441551395189, -0.0008510441551395189, 0.00016883698712266695, 0.00034715798956923955, -0.00017869100331692196, -0.00017869100331692196, -0.001275520583476054, -0.0004885423191519772, 0.00012555078906251334, 0.00012555078906251334, 0.0028653614401722843, -0.0008023399951605057, 0.0011760287859774613, 0.0011760287859774613, -0.0005423468659163991, -0.00017066612487367117, 0.0003102610817406156, -0.001127052578802167, -0.001465708865391472, -0.00028520412005307133, -0.00029795158858164227, 0.0002596403670543647, -5.819600689424957e-05, -0.0002980347643777659]
follow_joint_trajectory
These topics provide information about positions, velocities and accelerations of joints whilst executing a trajectory from the current pose to the goal pose:
/rh_trajectory_controller/follow_joint_trajectory/feedback /rh_trajectory_controller/follow_joint_trajectory/goal /rh_trajectory_controller/follow_joint_trajectory/result /rh_trajectory_controller/follow_joint_trajectory/status
The following topic is used to stop a currently executing trajectory:
/rh_trajectory_controller/follow_joint_trajectory/cancel
Position Controller - Command
/sh_rh_*_position_controller/command
These topics can be published to and are the set position of each joint in radians. The topics are subscribed to by the driver (/sr_hand_robot node). This topic is used to communicate the set position with the rqt Joint Sliders plugin, when using position control. The Hand can be set to position control using the Change Robot Control Mode rqt plugin.
$ rostopic info /sh_rh_ffj0_position_controller/command
Type: std_msgs/Float64 Publishers:
/rqt_gui_py_node_23644 (http://shadow-bravo:38385/) Subscribers:
/sr_hand_robot (http://shadow-bravo:45091/)
/rostopic_15687_1526406188893 (http://shadow-bravo:36637/)
/record (http://shadow-bravo:35575/)
Example topic message:
data: 0.628318530718
State
/sh_rh_*_position_controller/state
These topics are published at 87 Hz by the driver (/sr_hand_robot node). They contain messages of type control_msgs/JointControllerState, which contain the parameters used for each joints position controller.
Example topic message:
set_point: 1.1113358647 process_value: 1.11095072243 process_value_dot: 0.000426142920695 error: 0.0 time_step: 0.001 command: 0.0 p: -3800.0 i: 0.0d: 0.0 i_clamp: 0.0 antiwindup: False
Force
/sh_rh_*_position_controller/max_force_factor
The /sh_rh_*_position_controller/max_force_factor topic can be published to and scales down the maximum output command of the joints position controller. The output command is interpreted by the driver (/sr_hand_robot node) as PWM if the driver is in PWM mode, or as tendon force if it is in Torque mode. The maximum force is controlled by the parameter “max_force” that is specified in [this yaml file](https://github.com/shadow-robot/sr-config/blob/kinetic-devel/sr_ethercat_hand_config/controls/host/rh/sr_edc_joint_position_controllers_PWM.yaml#L9). max_force_factor has a value between [0.0, 1.0] and controls the percentage of the max_force that will be effectively considered.
This parameter doesn’t exist in the grasp controller.
PID parameters
/sh_rh_*_position_controller/pid/parameter_descriptions /sh_rh_*_position_controller/pid/parameter_updates
These topics are read-only and contain parameters used for tuning the position controllers. They should not be published directly, but can be accessed through rqt_reconfigure.
TF
/tf /tf_static
These topics store information on the active transforms in the ROS environment and holds their position and orientation in relation to their parents. Static tfs are fixed and the dynamic tfs update at 100 Hz. They can be published to, as well as read from. For further information on ROS tfs see the ROS wiki: <http://wiki.ros.org/tf>
Mechanism Statistics
/mechanism_statistics
This topic is read-only and updates at 1 Hz with the attributes of each joint, for example:
position: 0.715602037549 velocity: 0.0 measured_effort: -11.088 commanded_effort: -10.799974692 is_calibrated: False violated_limits: False odometer: 0.0 min_position: 0.715218542352 max_position: 0.715985532746 max_abs_velocity: 0.0363159179688 max_abs_effort: 15.84
Moveit! Topics
In Position control the Moveit topics are used for trajectory planning. They are described in their documentation here: <https://moveit.ros.org/documentation/>
Collisions
These are used for object collision avoidance if it is active.
/attached_collision_object /collision_object
Trajectory Execution
Live information regarding the current trajectory execution.
/execute_trajectory/cancel /execute_trajectory/feedback /execute_trajectory/goal /execute_trajectory/result /execute_trajectory/status
RViz Topics
These topics are used to interface with RViz. Documentation for this can be found here: <http://wiki.ros.org/rviz#User_Documentation>
/rviz_*/motionplanning_planning_scene_monitor/parameter_descriptions /rviz_*/motionplanning_planning_scene_monitor/parameter_updates /rviz_moveit_motion_planning_display/robot_interaction_interactive_marker_topic/feedback /rviz_moveit_motion_planning_display/robot_interaction_interactive_marker_topic/update /rviz_moveit_motion_planning_display/robot_interaction_interactive_marker_topic/update_full
### Using rosservice To reset individual motors, E.G. FFJ3:
## Writing controllers Rather than use the ROS topics to access sensor data, you will need to write a plugin for the Controller Manager. This will give you access to the sensor data at the full 1kHz rate, and allow you to create your own control algorithms for the hand. Please see this page for more information about the Controller Manager:
The Controller Manager is the node that talks to the hardware via EtherCAT and provides a facility for hosting plugins. The position controllers you have already used are examples of this. Note that the Controller Manager can host any number of running controllers but one should be loaded at a time for a given joint so they don’t fight for control.
## Deeper settings ### Editing PID settings The motor controller PID settings are stored in YAML files. You can find the files in the next folder:
### Changing motor data update rates Each motor can return two sensor readings every 2ms. The first is always the measured torque. The second is requested by the host. This allows the host to decide on the sensor update rate of each sensor. Currently, the rates cannot be adjusted at run-time, and are specified in a file that you can edit. To edit the file:
`bash
$ roscd sr_robot_lib/config
$ gedit motor_data_polling.yaml
`
The complete list of motor sensors appears in the file, along with a number ```eval_rst ======= =========================== Number Meaning ======= =========================== -2 Read once when the driver is launched -1 Read as fast as possible
0 Do not use zero
>0 Read period in seconds ======= =========================== ```
Sensors set to -1 will be read in turn, unless it’s time to read another sensor. Usually 5 sensors are set to -1, meaning that they are sampled at 100Hz.
## How to control the hand - the robot commander
The robot commander provides a high level interface to easily control the different robots supported by Shadow Robot. It encapsulates functionality provided by different ROS packages, especially the moveit_commander, providing access via a simplified interface.
There are three clases available: * [SrRobotCommander](https://github.com/shadow-robot/sr_interface/blob/noetic-devel/sr_robot_commander/src/sr_robot_commander/sr_robot_commander.py): base class. Documentation can be found in the following [link](https://dexterous-hand.readthedocs.io/en/latest/user_guide/2_software_description.html#srrobotcommander). * [SrHandCommander](https://github.com/shadow-robot/sr_interface/blob/noetic-devel/sr_robot_commander/src/sr_robot_commander/sr_hand_commander.py): hand management class. Documentation can be found in the following [link](https://dexterous-hand.readthedocs.io/en/latest/user_guide/2_software_description.html#srhandcommander). * [SrArmCommander](https://github.com/shadow-robot/sr_interface/blob/noetic-devel/sr_robot_commander/src/sr_robot_commander/sr_arm_commander.py): hand management class
### SrRobotCommander
#### Overview
The main purpose of the robot commander is to provide a base class to the
hand commander. The RobotCommander should not be used directly unless necessary.
Use the SrHandCommander instead.
Examples of usage can be found here.
In the following sections, you can find decriptions of the most relevant functions of the hand commander.
``` #### Basic terminology ``eval_rst A robot is described using an `srdf file which contains the semantic description that is not available in the urdf. It describes a robot as a collection of groups that are representations of different sets of joints that are useful for planning. Each group can have its end-effector and group states specified. Group states are a specific set of joint values predefined for a group with a given name, for example close_hand or open_hand.
As the robot commander is a high level wrapper of the moveit_commander, its constructor takes the name of one of the robot groups for which the planning will be performed.
Import the hand commander along with basic rospy libraries:
import rospy
from sr_robot_commander.sr_hand_commander import SrHandCommander
The constructor for the SrHandCommander takes a
name parameter that should match the group name of the robot to be used.
As well as creating an instance of the SrHandCommander class, we must also initialise our ros node:
rospy.init_node("sr_hand_commander_example", anonymous=True)
hand_commander = SrHandCommander("right_hand")
``` #### Getting basic information ```eval_rst We can get the name of the robot, group or planning reference frame:
print "Robot name: ", hand_commander.get_robot_name()
print "Group name: ", hand_commander.get_group_name()
print "Planning frame: ", hand_commander.get_planning_frame()
Get the list of names of the predefined group states from the srdf and warehouse for the current group:
# Refresh them first if they have recently changed
hand_commander.refresh_named_targets()

print "Named targets: ", hand_commander.get_named_targets()
Get the joints position and velocity:
joints_position = hand_commander.get_joints_position()
joints_velocity = hand_commander.get_joints_velocity()

print("Hand joint positions\n" + str(joints_position) + "\n")
print("Hand joint velocities\n" + str(joints_velocity) + "\n")
Get the current joint state of the group being used:
current_state = hand_commander.get_current_state()

# To get the current state while enforcing that each joint is within its limits
current_state = hand_commander.get_current_state_bounded()
``` #### Setting functions ```eval_rst You can change the reference frame to get pose information:
hand_commander.set_pose_reference_frame("palm")
You can also activate or deactivate the teach mode for the robot:
# Activation: stops the trajectory controllers for the robot, and sets it to teach mode.
hand_commander.set_teach_mode(True)

# Deactivation: stops the teach mode and starts trajectory controllers for the robot.
# Currently this method blocks for a few seconds when called on a hand, while the hand parameters are reloaded.
hand_commander.set_teach_mode(False)
`
#### Plan/move to a joint-space goal
```eval_rst
Using the methods ``plan_to_joint_value_target
, move_to_joint_value_target or move_to_joint_value_target_unsafe, a set of the joint values can be given for the specified group to create a plan and send it for execution.
Parameters:
joint_states is a dictionary with joint name and value. It can contain joints’ values of which need to be changed.
wait indicates if the method should wait for the movement to end or not (default value is True)
angle_degrees should be set to true if the input angles are in degrees (default value is False)
IMPORTANT: Bear in mind that the names of the joints are different for the right and left hand. ``` ##### Example ```eval_rst
rospy.init_node("robot_commander_examples", anonymous=True)

hand_commander = SrHandCommander(name="right_hand")
joints_states = {'rh_FFJ1': 90, 'rh_FFJ2': 90, 'rh_FFJ3': 90, 'rh_FFJ4': 0.0,
                 'rh_MFJ1': 90, 'rh_MFJ2': 90, 'rh_MFJ3': 90, 'rh_MFJ4': 0.0,
                 'rh_RFJ1': 90, 'rh_RFJ2': 90, 'rh_RFJ3': 90, 'rh_RFJ4': 0.0,
                 'rh_LFJ1': 90, 'rh_LFJ2': 90, 'rh_LFJ3': 90, 'rh_LFJ4': 0.0, 'rh_LFJ5': 0.0,
                 'rh_THJ1': 40, 'rh_THJ2': 35, 'rh_THJ3': 0.0, 'rh_THJ4': 65, 'rh_THJ5': 15,
                 'rh_WRJ1': 0.0, 'rh_WRJ2': 0.0}
hand_commander.move_to_joint_value_target(joints_states, wait=False, angle_degrees=True))
In this example, joint states for a hand are sent to the HandCommander,
the method is prompted by the wait=False argument to not wait for the
movement to finish executing before moving on to the next command and
the angle_degrees=True argument tells the method that the input
angles are in degrees, so require a conversion to radians.
``` #### Plan/move to a predefined group state ```eval_rst
Using the methods plan_to_named_target or move_to_named_target will allow to plan or move the group to a predefined pose. This pose can be defined in the srdf or saved as a group state in the moveit warehouse.
Parameters:
name is the unique identifier of the target pose
wait indicates if the method should wait for the movement to end or not (default value is True)
pack is a predefined pose defined in the SRDF file for the right_hand group:
<group_state group="right_hand" name="pack">
  <joint name="rh_THJ1" value="0.52"/>
  <joint name="rh_THJ2" value="0.61"/>
  <joint name="rh_THJ3" value="0.00"/>
  <joint name="rh_THJ4" value="1.20"/>
  <joint name="rh_THJ5" value="0.17"/>
  <joint name="rh_FFJ1" value="1.5707"/>
  <joint name="rh_FFJ2" value="1.5707"/>
  <joint name="rh_FFJ3" value="1.5707"/>
  <joint name="rh_FFJ4" value="0"/>
  <joint name="rh_MFJ1" value="1.5707"/>
  <joint name="rh_MFJ2" value="1.5707"/>
  <joint name="rh_MFJ3" value="1.5707"/>
  <joint name="rh_MFJ4" value="0"/>
  <joint name="rh_RFJ1" value="1.5707"/>
  <joint name="rh_RFJ2" value="1.5707"/>
  <joint name="rh_RFJ3" value="1.5707"/>
  <joint name="rh_RFJ4" value="0"/>
  <joint name="rh_LFJ1" value="1.5707"/>
  <joint name="rh_LFJ2" value="1.5707"/>
  <joint name="rh_LFJ3" value="1.5707"/>
  <joint name="rh_LFJ4" value="0"/>
  <joint name="rh_LFJ5" value="0"/>
  <joint name="rh_WRJ1" value="0"/>
  <joint name="rh_WRJ2" value="0"/>
</group_state>
Here is how to move to it:
rospy.init_node("robot_commander_examples", anonymous=True)
hand_commander = SrHandCommander(name="right_hand")

# Only plan
hand_commander.plan_to_named_target("pack")

# Plan and execute
hand_commander.move_to_named_target("pack")
`
#### Move through a trajectory of predefined group states
```eval_rst
Using the method ``run_named_trajectory
, it is possible to specify a trajectory composed of a set of names of previously defined group states (either from SRDF or from warehouse), plan and move to follow it.
```
Parameters:
- trajectory specifies a dictionary of waypoints with the following elements:
name: the name of the waypoint
interpolate_time: time to move from last waypoint
pause_time: time to wait at this waypoint
trajectory = [
   {
       'name': 'open',
       'interpolate_time': 3.0
   },
   {
       'name': 'pack',
       'interpolate_time': 3.0,
       'pause_time': 2
   },
   {
       'name': 'open',
       'interpolate_time': 3.0
   },
   {
       'name': 'pack',
       'interpolate_time': 3.0
   }
]

hand_commander.run_named_trajectory(trajectory)

# If you want to send the trajectory to the controller without using the planner, you can use the unsafe method:
hand_commander.run_named_trajectory_unsafe(trajectory)
``` #### Check if a plan is valid and execute it ```eval_rst
Use the method check_plan_is_valid and execute to check if the current plan contains a valid trajectory and execute it. This only has meaning if called after a planning function has been attempted.
```
##### Example
```eval_rst
import rospy
from sr_robot_commander.sr_hand_commander import SrHandCommander
rospy.init_node("robot_commander_examples", anonymous=True)

hand_commander = SrHandCommander()

hand_commander.plan_to_named_target("open")
if hand_commander.check_plan_is_valid():
    hand_commander.execute()
`
#### Stop the robot
```eval_rst
Use the method ``send_stop_trajectory_unsafe
to send a trajectory with the current joint state to stop the robot at its current position.
```
##### Example
```eval_rst
hand_commander.send_stop_trajectory_unsafe()
### SrHandCommander
The SrHandCommander inherits all methods from the robot commander and provides commands specific to the hand. It allows the state of the tactile sensors and joints’ effort to be read, and the maximum force to be set. ``` #### Setup ```eval_rst
Import the hand commander along with basic rospy libraries and the hand finder:
import rospy
from sr_robot_commander.sr_hand_commander import SrHandCommander
from sr_utilities.hand_finder import HandFinder
rospy.init_node("hand_finder_example", anonymous=True)
The constructor for the SrHandCommander takes a name parameter that should match the group name of the robot to be used. Also it takes the hand prefix, parameters and serial number that can be retrieved using the HandFinder.
# Using the HandFinder
hand_finder = HandFinder()
hand_parameters = hand_finder.get_hand_parameters()
hand_serial = hand_parameters.mapping.keys()[0]

# If name is not provided, it will set "right_hand" or "left_hand" by default, depending on the hand.
hand_commander = SrHandCommander(name = "rh_first_finger",
                                 hand_parameters=hand_parameters,
                                 hand_serial=hand_serial)

# Alternatively you can launch the hand directly
hand_commander = SrHandCommander(name = "right_hand", prefix = "rh")
``` #### Getting information ```eval_rst
Use the get_joints_effort method to get a dictionary with efforts of the group joints.
hand_joints_effort = hand_commander.get_joints_effort()
print("Hand joints effort \n " + str(hand_joints_effort) + "\n")
Use the get_tactile_type to get a string indicating the type of tactile
sensors present (e.g. PST, biotac, UBI0) or get_tactile_state to get
an object containing tactile data. The structure of the data is
different for every tactile_type .
tactile_type = hand_commander.get_tactile_type()
tactile_state = hand_commander.get_tactile_state()

print("Hand tactile type\n" + tactile_type + "\n")
print("Hand tactile state\n" + str(tactile_state) + "\n")
``` #### Set the maximum force ```eval_rst
Use the method set_max_force to set the maximum force for a hand joint.
Parameters:
joint_name name of the joint.
value maximum force value
## The limits in the current implementation of the firmware are from 200 to 1000 (measured in custom units)
hand_commander.set_max_force("rh_FFJ3", 600)
### SrArmCommander
The SrArmCommander inherits all methods from the [robot commander](https://dexterous-hand.readthedocs.io/en/latest/user_guide/2_software_description.html#srrobotcommander) and provides commands specific to the arm. It allows movement to a certain position in cartesian space, to a configuration in joint space or move using a trajectory.
#### Setup ```eval_rst Import the arm commander along with basic rospy libraries and the arm finder:
import rospy
from sr_robot_commander.sr_arm_commander import SrArmCommander
from sr_utilities.arm_finder import ArmFinder
The constructors for SrArmCommander take a name parameter that should match the group name of the robot to be used and has the option to add ground to the scene.
arm_commander = SrArmCommander(name="right_arm", set_ground=True)
Use the ArmFinder to get the parameters (such as prefix) and joint names of the arm currently running on the system:
arm_finder = ArmFinder()

# To get the prefix or mapping of the arm joints. Mapping is the same as prefix but without underscore.
arm_finder.get_arm_parameters().joint_prefix.values()
arm_finder.get_arm_parameters().mapping.values()

# To get the arm joints
arm_finder.get_arm_joints()
#### Getting basic information ```eval_rst To return the reference frame for planning in cartesian space:
reference_frame = arm_commander.get_pose_reference_frame()
#### Plan/move to a position target
`eval_rst
Using the method ``move_to_position_target
, the end effector of the arm can be moved to a certain point
in space represented by (x, y, z) coordinates. The orientation of the end effector can take any value.
Parameters:
xyz desired position of end-effector
end_effector_link name of the end effector link (default value is empty string)
wait indicates if the method should wait for the movement to end or not (default value is True)
rospy.init_node("robot_commander_examples", anonymous=True)
arm_commander = SrArmCommander(name="right_arm", set_ground=True)

new_position = [0.25527, 0.36682, 0.5426]

# To only plan
arm_commander.plan_to_position_target(new_position)

# To plan and move
arm_commander.move_to_position_target(new_position)
#### Plan/move to a pose target
`eval_rst
Using the method ``move_to_pose_target
allows the end effector of the arm to be moved to a certain pose
(position and orientation) in the space represented by (x, y, z, rot_x,
rot_y, rot_z).
Parameters:
pose desired pose of end-effector: a Pose message, a PoseStamped message or a list of 6 floats: [x, y, z, rot_x, rot_y, rot_z] or a list of 7 floats [x, y, z, qx, qy, qz, qw]
end_effector_link name of the end effector link (default value is empty string)
wait indicates if the method should wait for the movement to end or not (default value is True)
rospy.init_node("robot_commander_examples", anonymous=True)
arm_commander = SrArmCommander(name="right_arm", set_ground=True)

new_pose = [0.5, 0.3, 1.2, 0, 1.57, 0]

# To only plan
arm_commander.plan_to_pose_target(new_pose)

# To plan and move
arm_commander.move_to_pose_target(new_pose)
## Saving States To save a state you must first be connected to the warehouse. After launching the hand, click the green Connect button in the ‘Context’ tab of rviz.
`eval_rst
.. image:: ../img/rviz_warehouse_connect.png
`
If you have connected successfully you should see two new buttons, Reset database and Disconnect, as can be seen in the following picture:
`eval_rst
.. image:: ../img/rviz_warehouse_connected.png
`
Next, go to the ‘Stored States’ tab in ‘Motion Planning’. Here you have full control over the saved states in the warehouse. You can then follow these steps: * move the hand to the grasp position * Go to the ‘Planning’ tab and in the ‘Select Goal State’ select ‘current’ and click update.
`eval_rst
.. image:: ../img/rviz_select_goal_state.png
`
Finally, go to the ‘Stored States’ tab and click the button Save Goal under the ‘Current State’ group. A prompt will appear to ask you to name the state. Once named, you can plan to and from this state.
`eval_rst
.. image:: ../img/save_state.png
`
## Recording ROS Bags
A rosbag or bag is a file format in ROS for storing ROS message data. These bags are often created by subscribing to one or more ROS topics, and storing the received message data in an efficient file structure.
The different ways to record and playback ROS bags can be found [here](http://wiki.ros.org/rosbag)
### Example: Recording and playing a ROS Bag of joint states To record a ROS Bag of the /joint_states topic for 1 minute and name it joint_state_bag.bag. The [command-line tool](http://wiki.ros.org/rosbag/Commandline) can be used:
rosbag record --duration=1m joint_state_bag.bag /joint_states
To find information about the rosbag joint_state_bag.bag:
rosbag info joint_state_bag.bag
To play back this ROS Bag:
rosbag play joint_state_bag.bag
The rosbag command-line has many different options of how to record and playback various topics that are published, these can be found [here](http://wiki.ros.org/rosbag/Commandline).
## Copying data out of the dexterous hand container
docker cp is a way to copy files/folders between a container and the local filesystem. An extended description can be found [here](https://docs.docker.com/engine/reference/commandline/cp/).
Coping FROM the container TO the file system:
docker cp [OPTIONS] CONTAINER:SRC_PATH DEST_PATH
Copying FROM the file system TO the container:
docker cp [OPTIONS] DEST_PATH CONTAINER:SRC_PATH
Some of the [OPTIONS] include:
Name, shorthand |
Description |
|---|---|
–archive , -a |
Archive mode (copy all uid/gid information) |
–follow-link , -L |
Always follow symbol link in SRC_PATH |
## Hand autodetection (new in Noetic)
This feature allows users to detect Shadow Hands without knowing the ethernet interface or the hand serial and run launchfiles without needing to provide detailed information about the hands. It is implemented in the [sr_hand_detector package](https://github.com/shadow-robot/sr_hand_detector) and consists of two scripts.
In all Shadow’s docker images the feature will be available out of the box, however, for custom setups, you might need to install it manually. Recommended way is just to use debian installation:
sudo apt update && sudo apt install ros-<rosdistro>-sr-hand-detector
If for some reason a manual installation is required, you can follow steps below:
Clone the repository to your ROS workspace
Compile the code
Copy both executables of the sr_hand_detector package (found in
<your_workspace>/devel/lib/sr_hand_detector) to/usr/local/bin.Give one of the executables capability to access ethernet devices:
sudo setcap cap_net_raw+ep sr_hand_detector_node
Finally, if you want to use the autodetection feature with our launchfiles, you need to clone [sr_hand_config package](https://github.com/shadow-robot/sr_hand_config) into your workspace.
### sr_hand_detector_node ```eval_rst The script is purely for hand detection. Usage:
sr_hand_detector_node
Example output:
Detected hand on port: enx000ec653b31a
Hand's serial number: 634
Apart from the console output, all detected hand ethernet port names together with corresponding hand serial numbers will be set inside of the /tmp/sr_hand_detector.yaml file.
If there are no hands detected on any of the ports, a warning will be shown:
No hand detected on any of the ports!
``` ### sr_hand_autodetect ```eval_rst
This script is a launchfile wrapper, and allows users to run Shadow Robot launch files without providing information like hand serial, ethercat port or hand side. Example usage:
sr_hand_autodetect roslaunch sr_robot_launch srhand.launch sim:=false
which will effectively run:
roslaunch sr_robot_launch srhand.launch sim:=false eth_port:=<eth_port> hand_serial:=<hand_serial> side:=<hand_side> hand_type:=<hand_type> mapping_path:=<mapping_path>
When using the wrapper, all the necessary information is extracted from the [sr_hand_config package](https://github.com/shadow-robot/sr_hand_config).